AWD

OIL PAN
REMOVAL AND INSTALLATION
REMOVAL SERVICE POINTS
[[A]] ENGINE LOWER OIL PAN REMOVAL
1. Remove the engine lower oil pan mounting bolts.
CAUTION: Do not use oil pan remover special tool MD998727. The engine upper oil pan is made of aluminum and this tool will damage it.
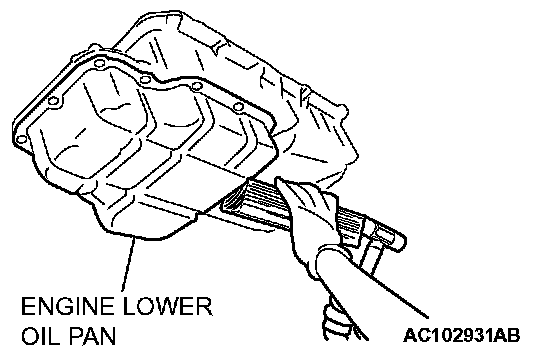
2. Apply a piece of wood to the lower oil pan and strike it with a hammer to remove the engine lower oil pan.
[[B]] ENGINE UPPER OIL PAN REMOVAL
1. Remove the engine upper oil pan mounting bolts.
CAUTION: Do not use oil pan remover special tool MD998727. The engine upper oil pan is made of aluminum and this tool will damage it.
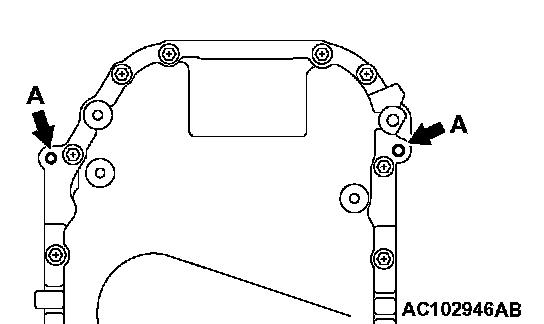
2. Screw in the bolt into bolt hole A in the location shown. Then lift the upper oil pan and remove it.
INSTALLATION SERVICE POINTS
]]A[[ ENGINE UPPER OIL PAN INSTALLATION
1. Remove sealant from the engine upper oil pan, front case and cylinder block surfaces.
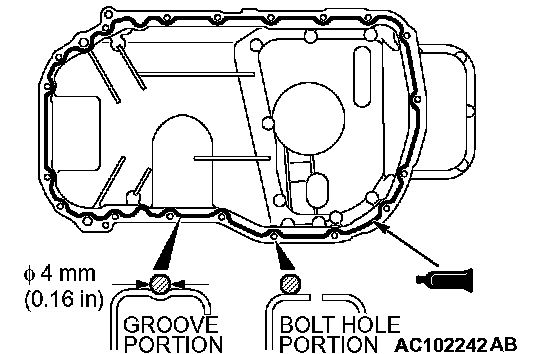
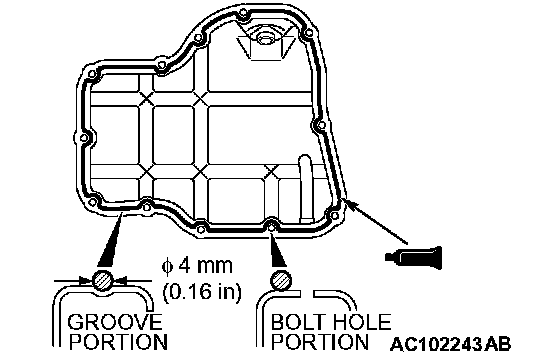
2. Apply a bead of the sealant to the mating surface of the engine upper oil pan as shown.
Specified sealant: 3M(TM) AAD Part No.8672, 8704, 3M(TM) AAD Part No.8679/8678 or equivalent
NOTE: Install the engine upper oil pan within 15 minutes after applying sealant.
3. Assemble the engine upper oil pan to the cylinder block.
CAUTION: Wait at least one hour. Never start the engine or let engine oil or coolant touch the sealant surface during that time.

4. Insert the bolts to the engine upper oil pan as shown, and tighten to the specified torque.
NOTE: D: Nominal diameter, L: Nominal length
Tightening torque: 9.0 ± 3.0 Nm (80 ± 26 inch lbs.)
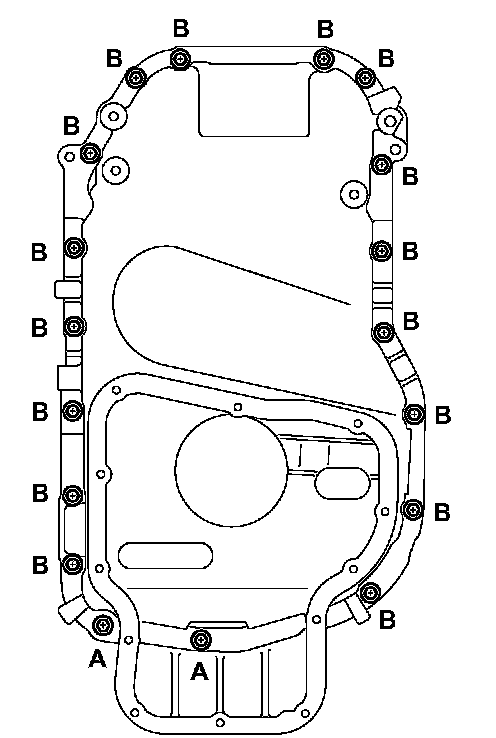
]]B[[ ENGINE LOWER OIL PAN INSTALLATION
1. Remove sealant from the engine lower oil pan and engine upper oil pan.
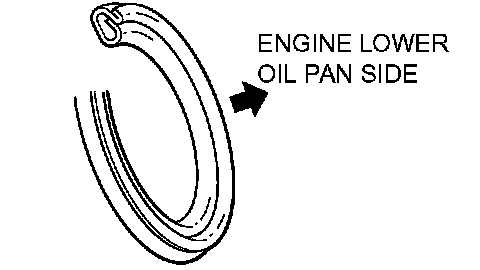
2. Apply a bead of the sealant to the mating surface of the engine lower oil pan as shown.
Specified sealant: 3M(TM) AAD Part No.8672, 8704, 3M(TM) AAD Part No.8679/8678 or equivalent
NOTE: Install the engine lower oil pan within 15 minutes after applying sealant.
3. Assemble the engine lower oil pan to the engine upper oil pan.
CAUTION: Wait at least one hour. Never start the engine or let engine oil or coolant touch the sealant surface during that time.
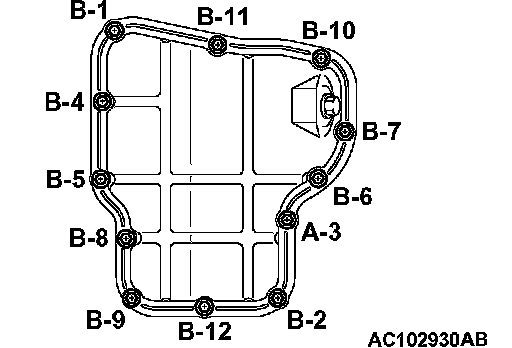
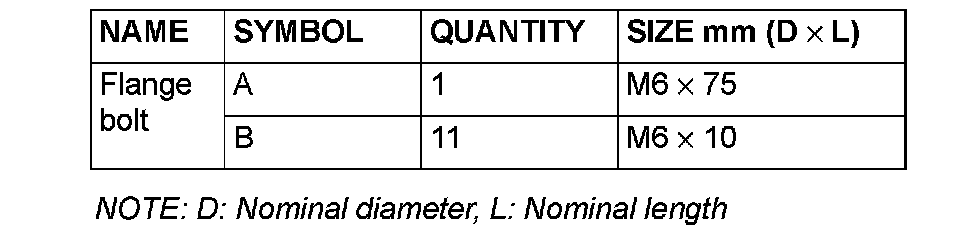
4. Insert the bolts to the engine lower oil pan as shown, and tighten them to the specified torque in the order shown.
NOTE: D: Nominal diameter, L: Nominal length
Tightening torque: 9.0 ± 3.0 Nm (80 ± 26 inch lbs.)
]]C[[ ENGINE OIL PAN DRAIN PLUG GASKET INSTALLATION
Replace the gasket with a new one. Install the new gasket in the direction shown in the illustration.
]]D[[ TRANSAXLE HOUSING FRONT LOWER COVER STAY INSTALLATION
Install the transaxle housing front lower cover stay in the following order.
1. Tighten the engine side four mounting bolts to the specified torque.
Tightening torque: 22 ± 4 Nm (16 ± 3 ft. lbs.)
2. Tighten the transaxle side two mounting bolts to the specified torque.
Tightening torque: 44 ± 10 Nm (33 ± 7 ft. lbs.)
INSPECTION
^ Check the oil pan for cracks.
^ Check the oil pan sealant-coated surface for damage and deformation.