Inspection Procedure 4
INSPECTION PROCEDURE 4: No Sound from One Speaker.Speaker System Circuit <With Amplifier> Part 1:
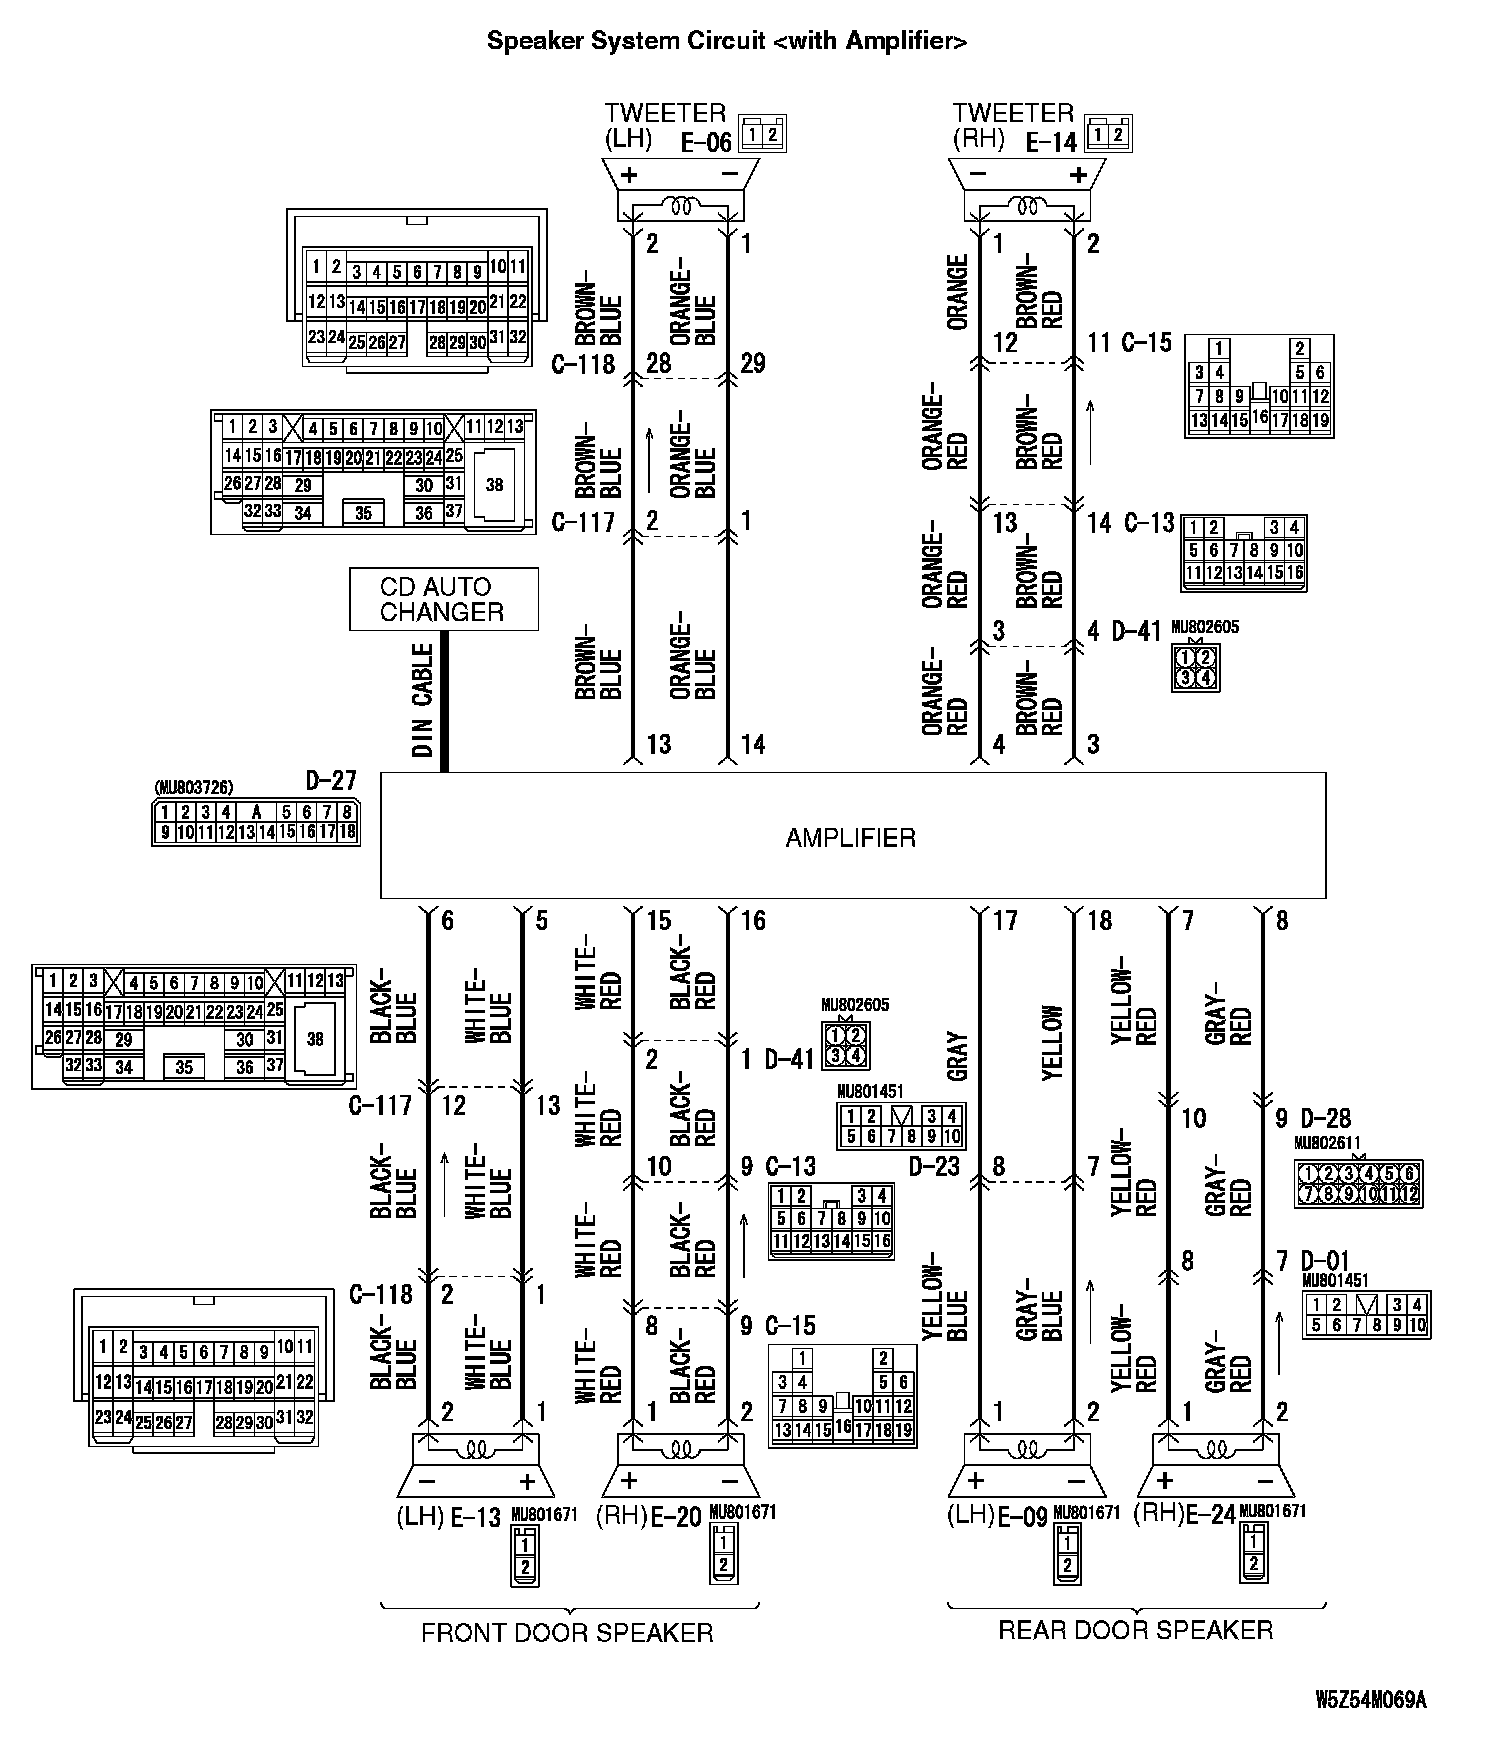
Speaker System Circuit <With Amplifier> Part 2:
CIRCUIT OPERATION
- The sound signals are sent from the radio and CD player into the amplifier. After the signals are amplified and filtered, the sound signals are sent to the door speaker.
TECHNICAL DESCRIPTION (COMMENT)
The cause is probably a faulty door speaker circuit system.
TROUBLESHOOTING HINTS
- Malfunction of the door speaker.
- Malfunction of the tweeter.
- Damaged wiring harness or connector.
- Malfunction of the radio and CD player.
- Malfunction of the amplifier.
DIAGNOSIS
STEP 1. Check to see which door speaker or tweeter the sound is not output from.
Use the speaker test to determine which door speaker does not
sound.
Q: Which door speaker is not working?
Front door speaker (LH): Go to Step 2.
Front door speaker (RH): Go to Step 6.
Rear door speaker (LH): Go to Step 10.
Rear door speaker (RH): Go to Step 14.
Tweeter (LH): Go to Step 18.
Tweeter (RH): Go to Step 22.
STEP 2. Check the front door speaker (LH).

1. Remove the front door speaker (LH).
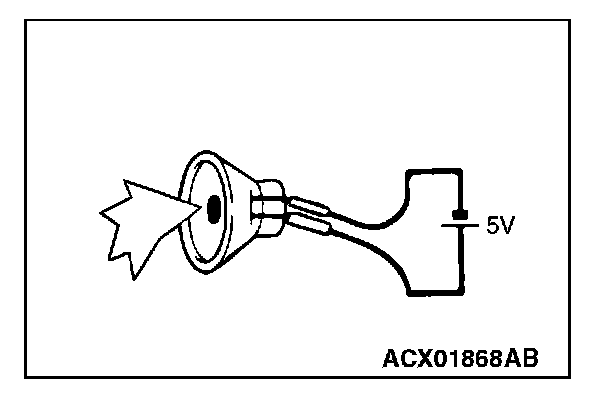
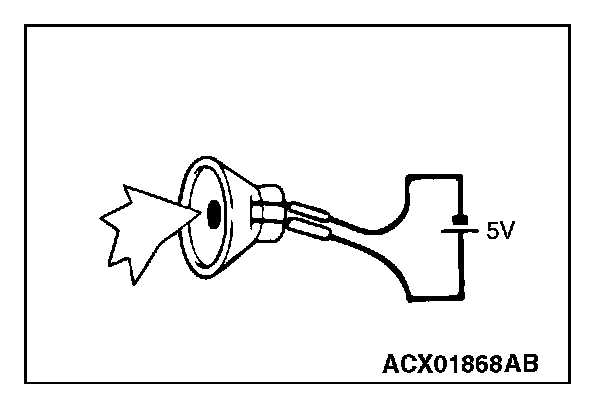
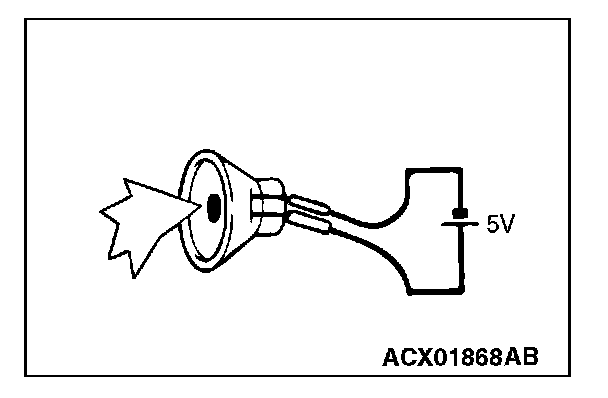
2. Check that the front door speaker (LH) generates noise when a five-volt voltage is applied on the front door speaker (LH) terminal.
Q: Is the front door speaker (LH) generating noise?
YES: Go to Step 3.
NO: Replace the front door speaker (LH). The front door speaker (LH) should sound.
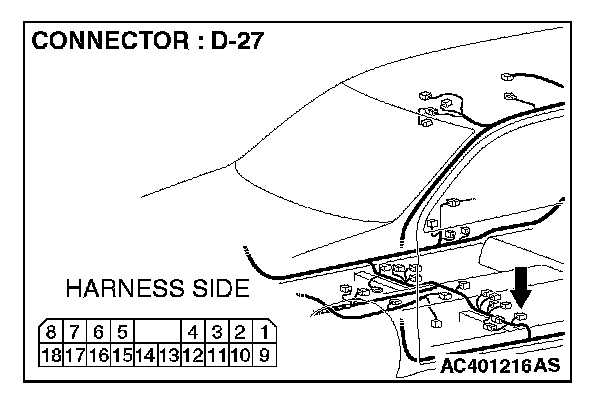
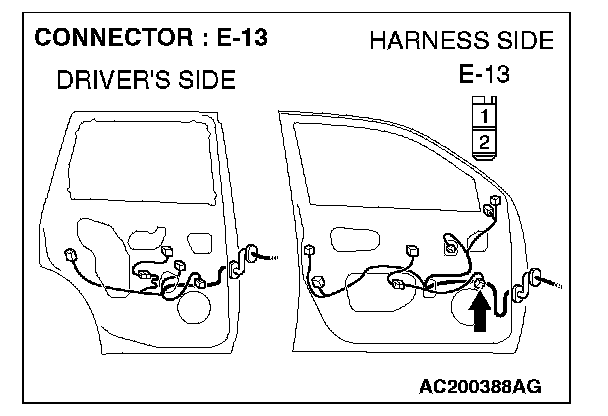
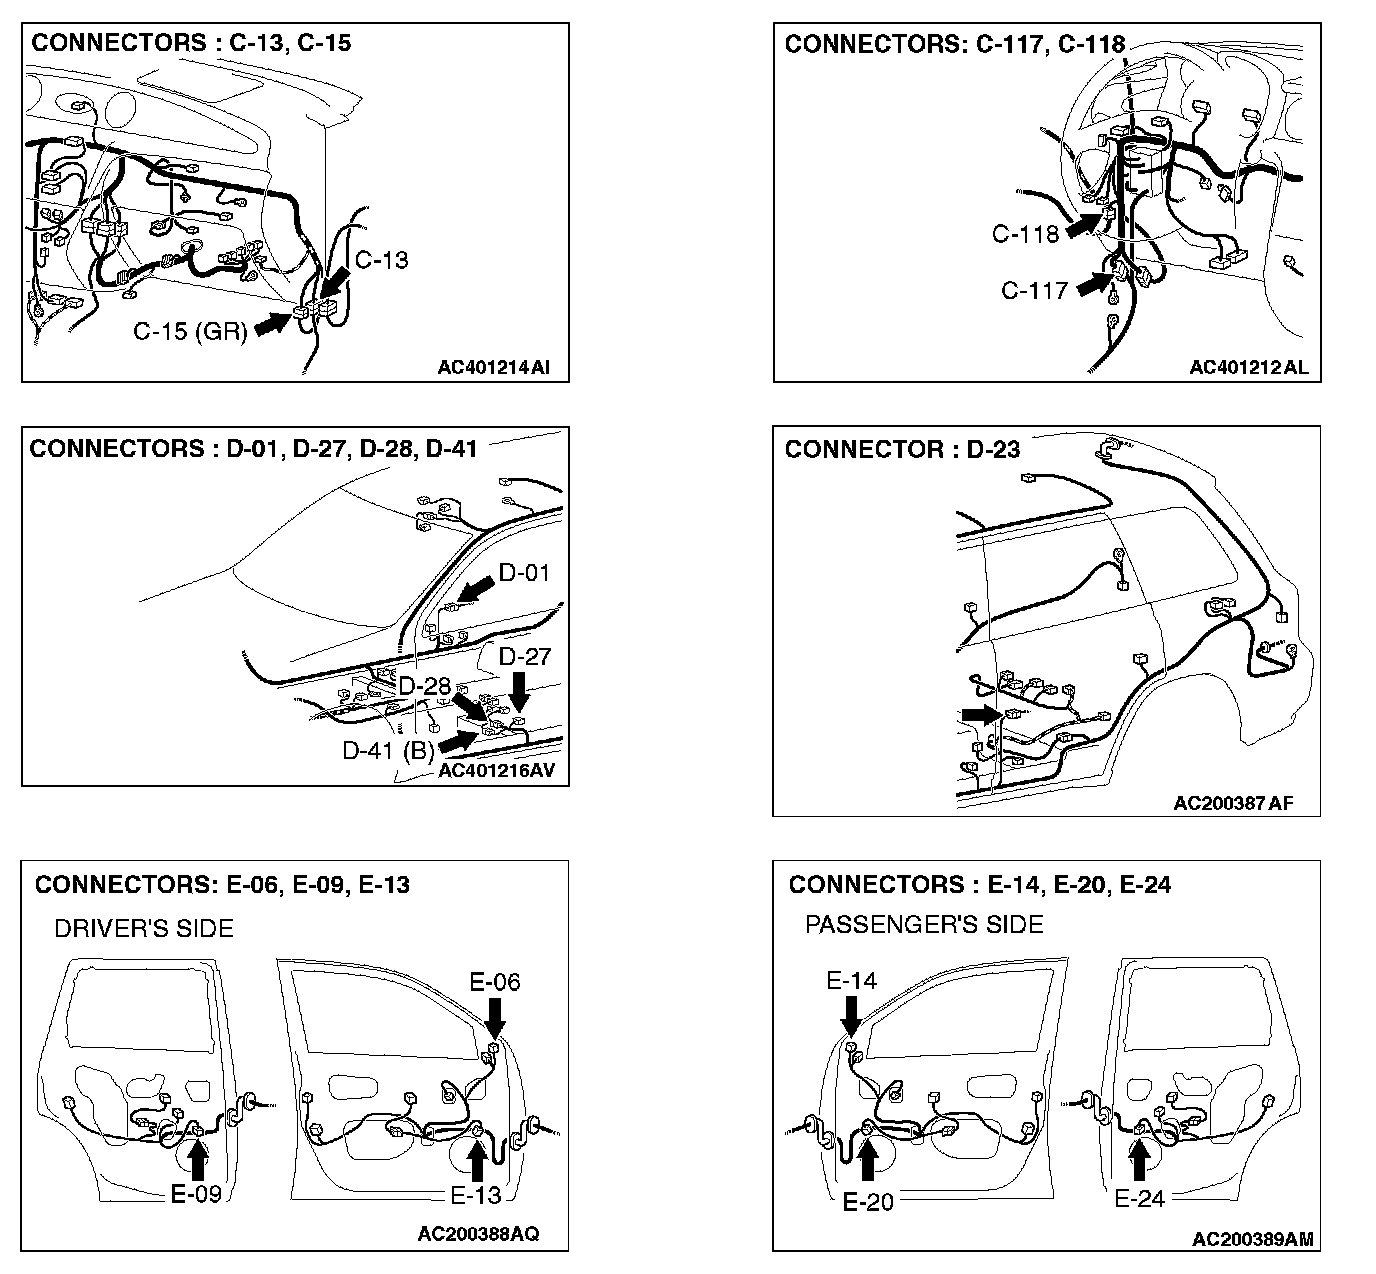
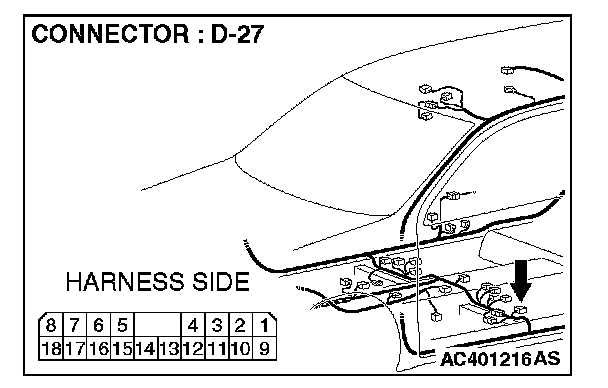
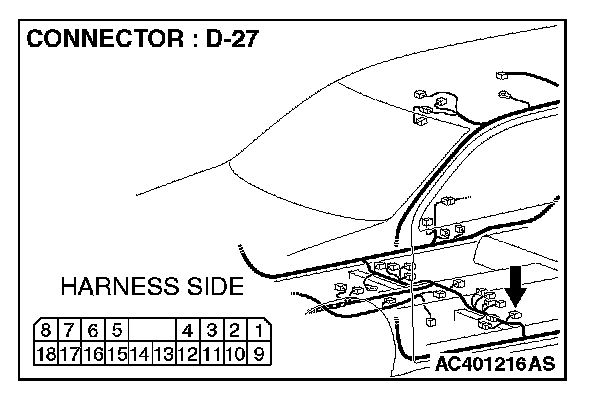
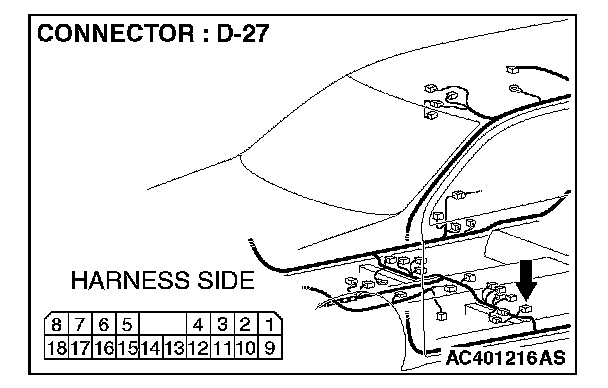
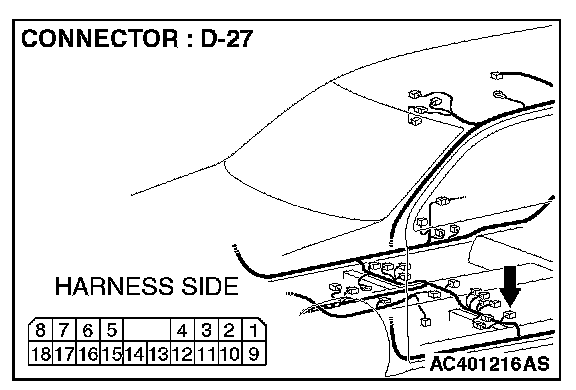
STEP 3. Check front door speaker (LH) connector E-13 and amplifier connector D-27 for damage.
Q: Are front door speaker (LH) connector E-13 and amplifier connector D-27 in good condition?
YES: Go to Step 4.
NO: Repair or replace the connector. The front door speaker (LH) should sound.
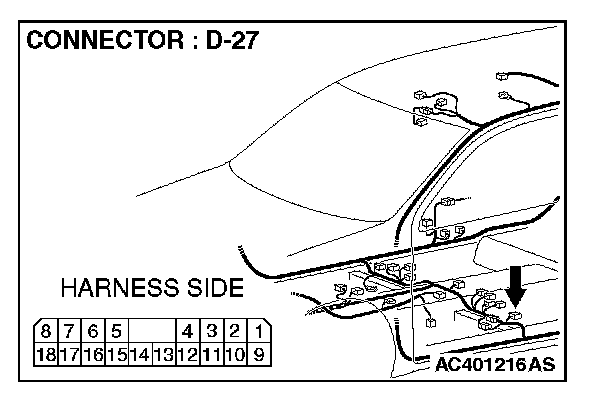
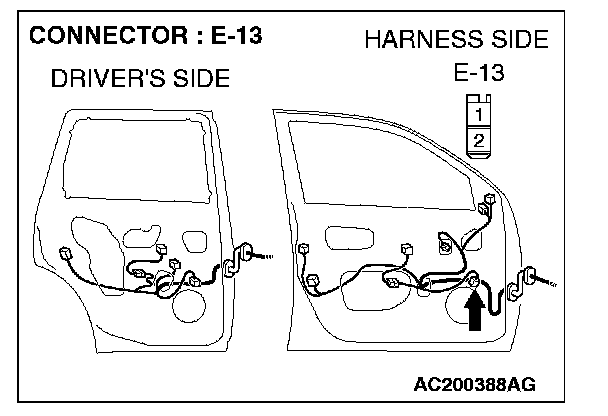
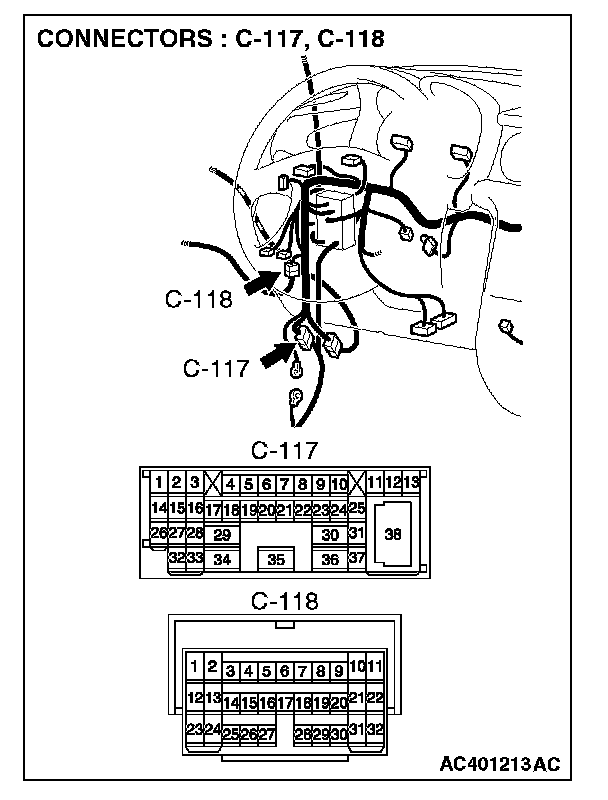
STEP 4. Check the wiring harness between front door speaker (LH) connector E-13 (terminal 1 and 2) and amplifier connector D-27 (terminal 5 and 6).
NOTE: Also check intermediate connector C-117 and C-118. If intermediate connector C-117 or C-118 are damaged, repair or replace the connector as described in Harness Connector Inspection.
Q: Are the wiring harness between front door speaker (LH) connector E-13 (terminal 1 and 2) and amplifier connector D-27 (terminal 5 and 6) in good condition?
YES: Go to Step 5.
NO: Repair the wiring harness. The front door speaker (LH) should sound.
STEP 5. Replace the radio and CD player.
Q: Is sound output normally from the speakers?
YES: There is no action to be taken.
NO: Repair or replace the amplifier. The front door speaker (LH) should sound.
STEP 6. Check the front door speaker (RH).

1. Remove the front door speaker (RH).
2. Check that the front door speaker (RH) generates noise when a five-volt voltage is applied on the front door speaker (RH) terminal.
Q: Is the front door speaker (RH) generating noise?
YES: Go to Step 7.
NO: Replace the front door speaker (RH). The front door speaker (RH) should sound.
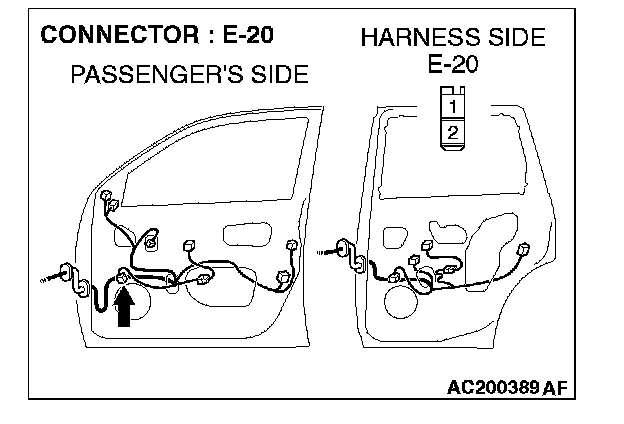
STEP 7. Check front door speaker (RH) connector E-20 and amplifier connector D-27 for damage.
Q: Are front door speaker (RH) connector E-20 and amplifier connector D-27 in good condition?
YES: Go to Step 8.
NO: Repair or replace the connector. The front door speaker (RH) should sound.
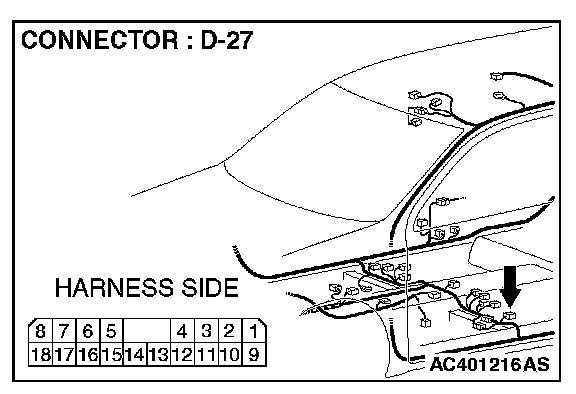
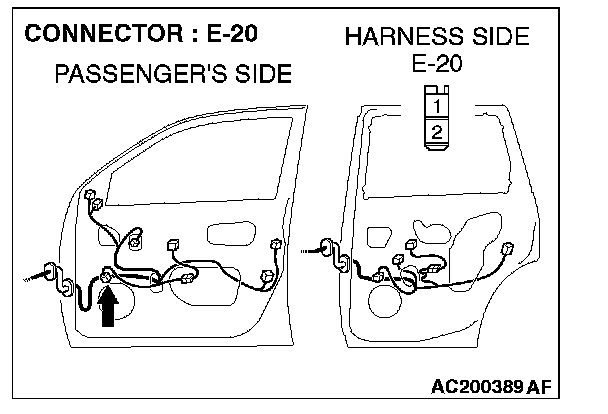
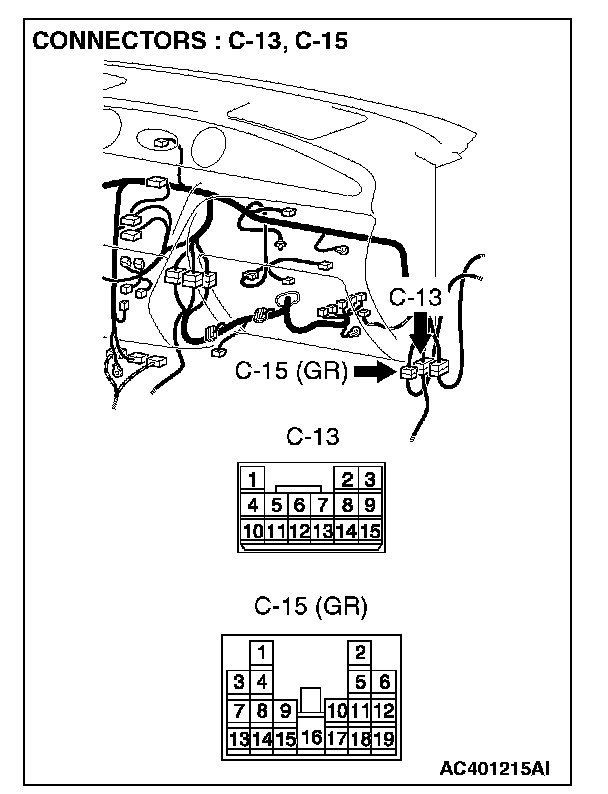
STEP 8. Check the wiring harness between front door speaker (RH) connector E-20 (terminal 1 and 2) and amplifier connector D-27 (terminal 15 and 16).
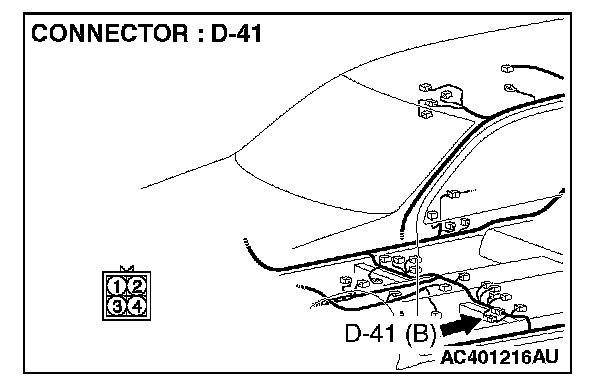
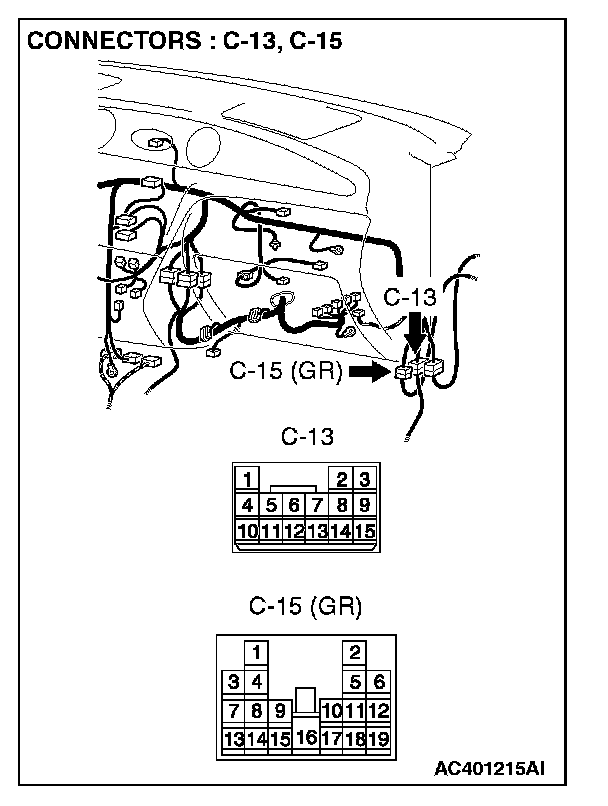
NOTE: Also check intermediate connector C-13, C-15 and D-41. If intermediate connector C-13, C-15 or D-41 are damaged, repair or replace the connector as described in Harness Connector Inspection.
Q: Are the wiring harness between front door speaker (RH) connector E-20 (terminal 1 and 2) and amplifier connector D-27 (terminal 15 and 16) in good condition?
YES: Go to Step 9.
NO: Repair the wiring harness. The front door speaker (RH) should sound.
STEP 9. Replace the radio and CD player. Is sound output normally from the speakers?
YES: There is no action to be taken.
NO: Repair or replace the amplifier. The front door speaker (RH) should sound.
STEP 10. Check the rear door speaker (LH).
1. Remove the rear door speaker (LH).
2. Check that the rear door speaker (LH) generates noise when a five-volt voltage is applied on the rear door speaker (LH) terminal.
Q: Is the rear door speaker (LH) generating noise?
YES: Go to Step 11.
NO: Replace the rear door speaker (LH). The rear door speaker (LH) should sound.
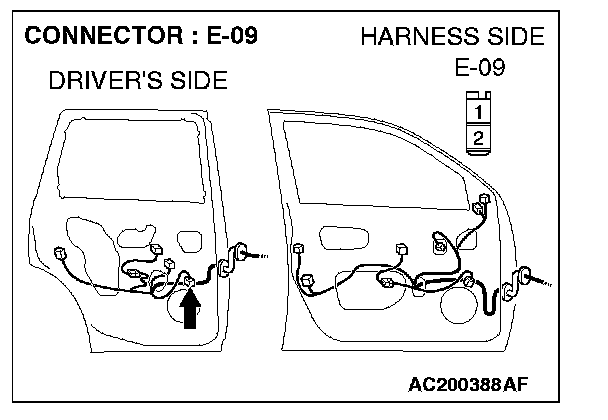
STEP 11. Check rear door speaker (LH) connector E-09 and amplifier connector D-27 for damage.
Q: Are rear door speaker (LH) connector E-09 and amplifier connector D-27 in good condition
YES: Go to Step 12.
NO: Repair or replace the connector. The rear door speaker (LH) should sound.
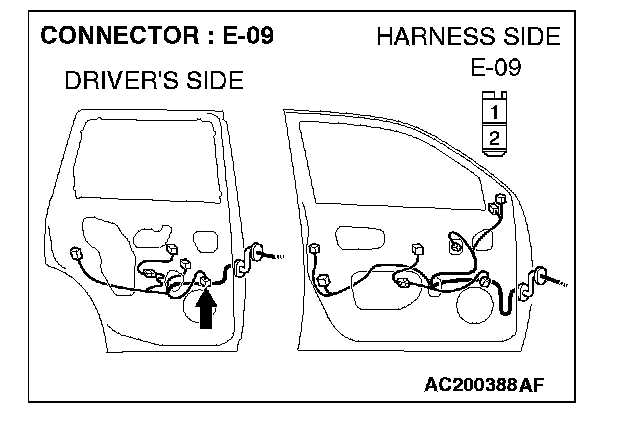
STEP 12. Check the wiring harness between rear door speaker (LH) connector E-09 (terminal 1 and 2) and amplifier connector D-27 (terminal 17 and 18).
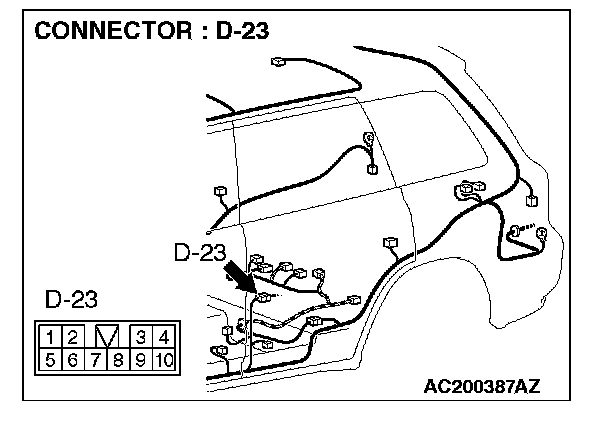
NOTE: Also check intermediate connector D-23. If intermediate connector D-23 is damaged, repair or replace the connector as described in Harness Connector Inspection.
Q: Are the wiring harness between rear door speaker (LH) connector E-09 (terminal 1 and 2) and amplifier connector D-27 (terminal 17 and 18) in good condition?
YES: Go to Step 13.
NO: Repair the wiring harness. The rear door speaker (LH) should sound.
STEP 13. Replace the radio and CD player.
Q: Is sound output normally from the speakers?
YES: There is no action to be taken.
NO: Repair or replace the amplifier. The rear door speaker (LH) should sound.
STEP 14. Check the rear door speaker (RH).

1. Remove the rear door speaker (RH).
2. Check that the rear door speaker (RH) generates noise when a five-volt voltage is applied on the rear door speaker (RH) terminal.
Q: Is the rear door speaker (RH) generating noise?
YES: Go to Step 15.
NO: Replace the rear door speaker (RH). The rear door speaker (RH) should sound.

STEP 15. Check rear door speaker (RH) connector E-24 and amplifier connector D-27 for damage.
Q: Are rear door speaker (RH) connector E-24 and amplifier connector D-27 in good condition?
YES: Go to Step 16.
NO: Repair or replace the connector. The rear door speaker (RH) should sound.
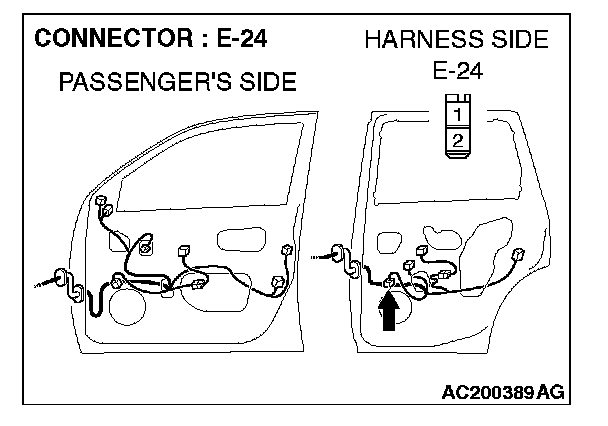
STEP 16. Check the wiring harness between rear door speaker (RH) connector E-24 (terminal 1 and 2) and audio amplifier connector D-27 (terminal 7 and 8).
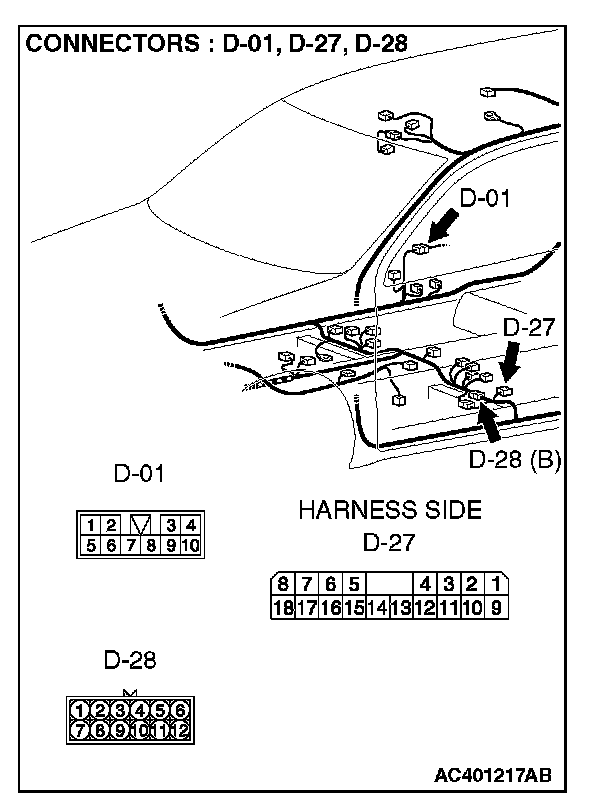
NOTE: Also check intermediate connector D-01 and D-28. If intermediate connector D-01 or D-28 are damaged, repair or replace the connector as described in Harness Connector Inspection.
Q: Is the wiring harness between rear door speaker (RH) connector E-24 (terminal 1 and 2) and amplifier connector D-27 (terminal 7 and 8) in good condition?
YES: Go to Step 17.
NO: Repair the wiring harness. The rear door speaker (RH) should sound.
STEP 17. Replace the radio and CD player.
Q: Is sound output normally from the speakers?
YES: There is no action to be taken.
NO: Repair or replace the amplifier. The rear door speaker (RH) should sound.
STEP 18. Check the tweeter (LH).
1. Remove the tweeter (LH).
2. Check that the tweeter (LH) generates noise when a five-volt voltage is applied on the tweeter (LH) terminal.
Q: Is the tweeter (LH) generating noise?
YES: Go to Step 19.
NO: Replace the tweeter (LH). The tweeter (LH) should sound.
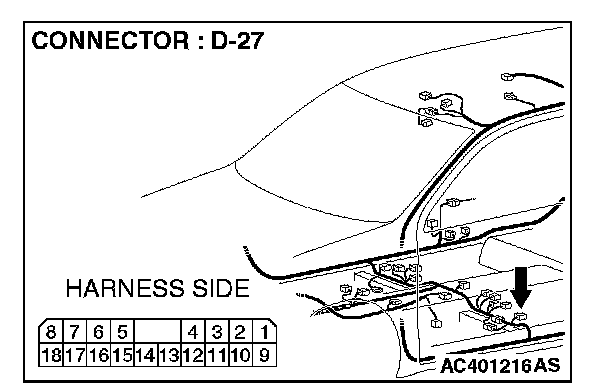
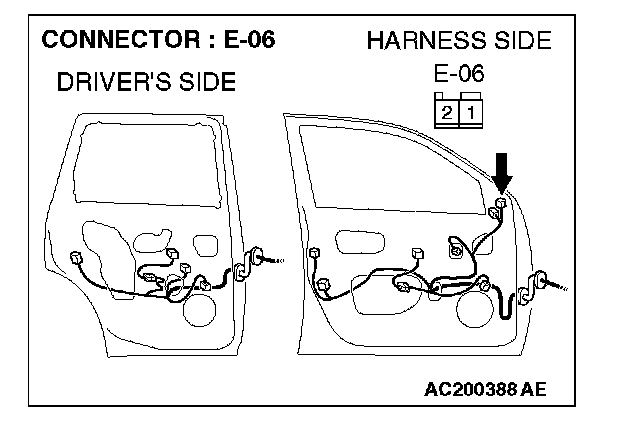
STEP 19. Check tweeter (LH) connector E-06 and amplifier connector D-27 for damage.
Q: Are tweeter (LH) connector E-06 and amplifier connector D-27 in good condition?
YES: Go to Step 20.
NO: Repair or replace the connector. The tweeter (LH) should sound.
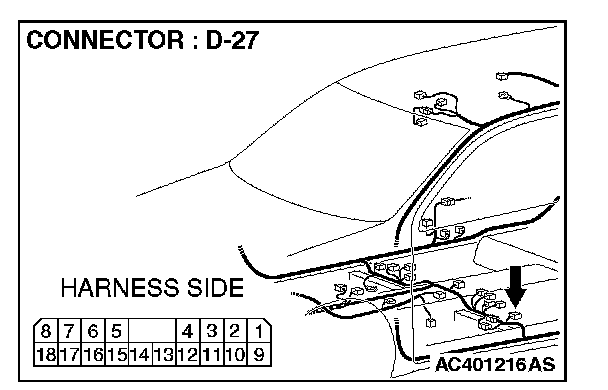
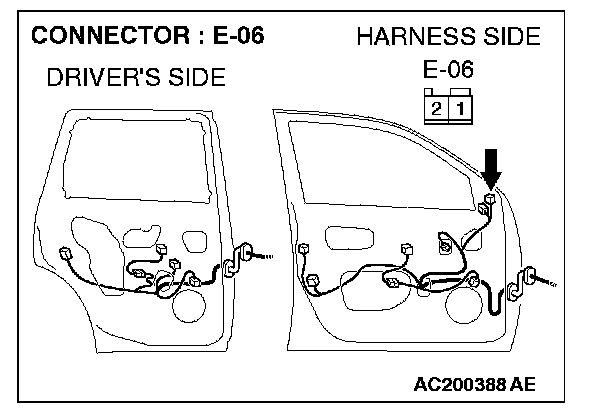
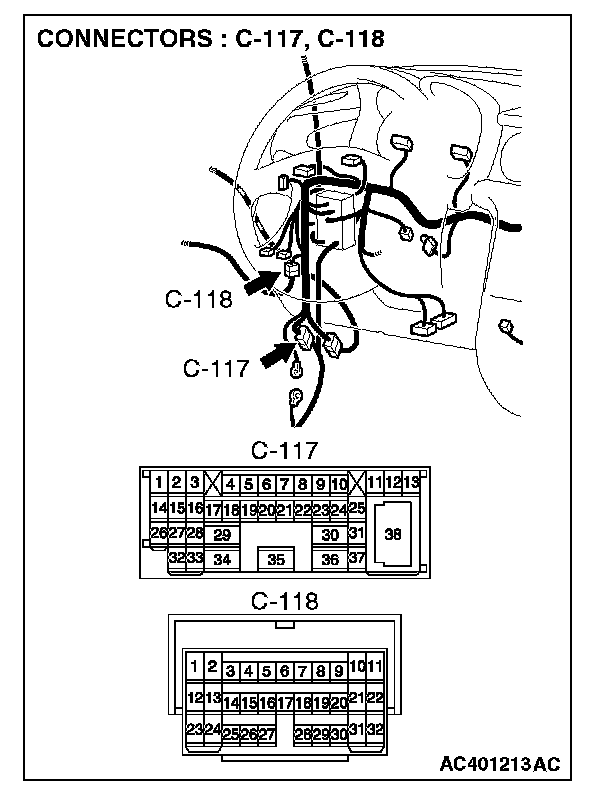
STEP 20. Check the wiring harness between tweeter (LH) connector E-06 (terminal 1 and 2) and amplifier connector D-27 (terminal 14 and 13).
NOTE: Also check intermediate connector C-117 and C-118. If intermediate connector C-117 or C-118 are damaged, repair or replace the connector as described in Harness Connector Inspection.
Q: Are the wiring harness between tweeter (LH) connector E-06 (terminal 1 and 2) and amplifier connector D-27 (terminal 14 and 13) in good condition?
YES: Go to Step 21.
NO: Repair the wiring harness. The tweeter (LH) should sound.
STEP 21. Replace the radio and CD player.
Q: Is sound output normally from the speakers?
YES: There is no action to be taken.
NO: Repair or replace the amplifier. The tweeter (LH) should sound.
STEP 22. Check the tweeter (RH).
1. Remove the tweeter (RH).
2. Check that the tweeter (RH) generates noise when a five-volt voltage is applied on the tweeter (RH) terminal.
Q: Is the tweeter (RH) generating noise?
YES: Go to Step 23.
NO: Replace the tweeter (RH). The tweeter (RH) should sound.
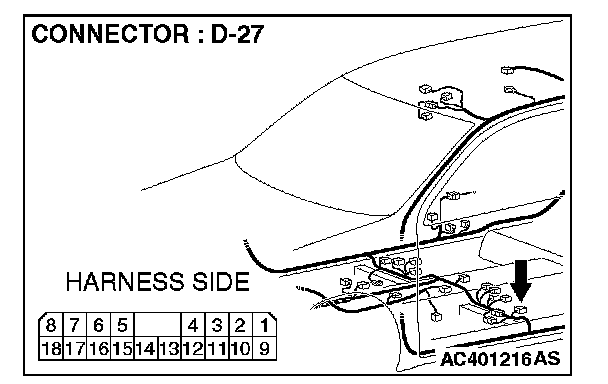
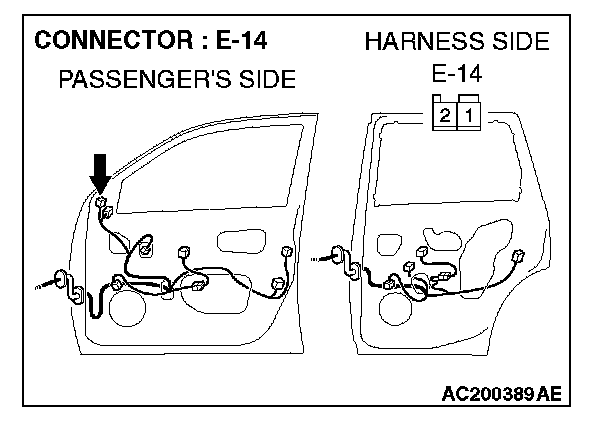
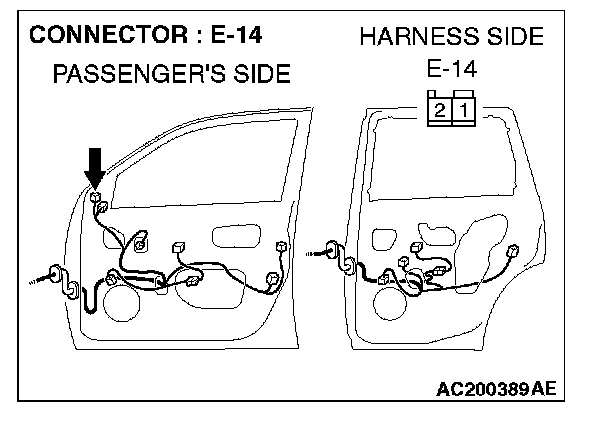
STEP 23. Check tweeter (RH) connector E-14 and amplifier connector D-27 for damage.
Q: Are tweeter (RH) connector E-14 and amplifier connector D-27 in good condition?
YES: Go to Step 24.
NO: Repair or replace the connector. The tweeter (RH) should sound.
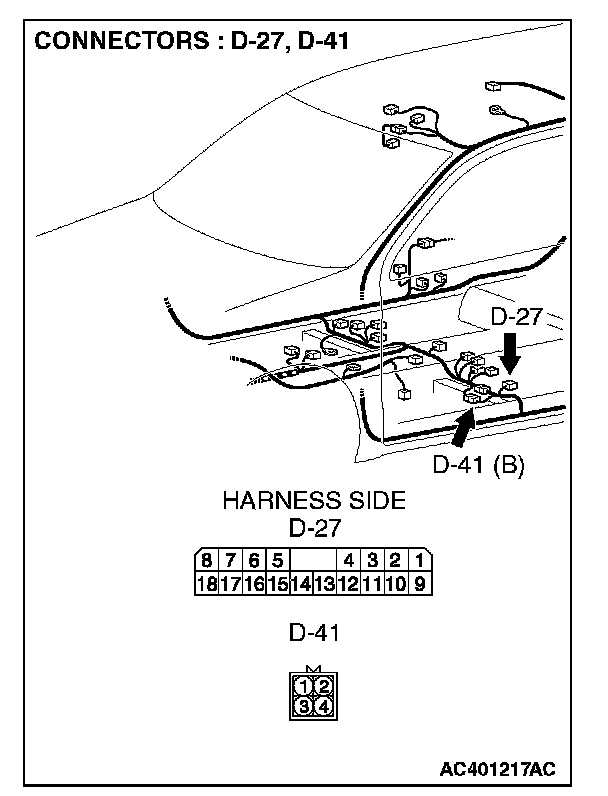
STEP 24. Check the wiring harness between tweeter (RH) connector E-14 (terminal 1 and 2) and amplifier connector D-27 (terminal 4 and 3).
NOTE: Also check intermediate connector C-13, C-15 and D-41. If intermediate connector C-13, C-15 or D-41 are damaged, repair or replace the connector as described in Harness Connector Inspection.
Q: Are the wiring harness between tweeter (RH) connector E-14 (terminal 1 and 2) and amplifier connector D-27 (terminal 4 and 3) in good condition?
YES: Go to Step 25.
NO: Repair the wiring harness. The tweeter (RH) should sound.
STEP 25. Replace the radio and CD player.
Q: Is sound output normally from the speakers?
YES: There is no action to be taken.
NO: Repair or replace the amplifier. The tweeter (RH) should sound.